Sécurité du rack à squat : conseils et orientations essentiels

La sécurité d'un rack à squat dépend de son installation. Cet article vous explique comment personnaliser les réglages de votre rack à squat pour une sécurité optimale.
Aucune salle de sport sérieuse n'est complète sans un rack de musculation. Qu'il s'agisse d'un rack à squat, d'un demi-rack ou d'un power rack, cet appareil vous permet de soulever un poids maximal en toute sécurité, même en solo. Mais l'efficacité d'un rack dépend de votre capacité à l'utiliser correctement.
Mal installé et mal utilisé, un rack à squat peut rendre un exercice plus dangereux. En tant qu'ancien propriétaire de salle de sport et entraîneur personnel, j'ai vu trop de racks mal installés pour m'en souvenir.
Dans cet article, je vous propose un guide complet pour utiliser le rack à squat en toute sécurité, en particulier à domicile. Vous commencerez par l'achat du rack adapté, puis vous apprendrez à le personnaliser en fonction de votre taille et de la profondeur de vos squats, et à vous entraîner dans la zone de sécurité du rack. Je vous montrerai même comment abandonner un exercice en toute sécurité si vous ne parvenez pas à terminer une répétition.
Que rechercher dans un rack à squat
Acheter un rack à squat peut s'avérer complexe. Le choix est vaste. Si le prix est votre critère principal, vous risquez de vous retrouver avec un rack esthétique, mais manquant de robustesse et de durabilité pour une performance durable.
Voici cinq éléments à prendre en compte lors de l’achat d’un support à squat :
Type de rack
Votre première décision concerne le type de rack que vous allez acheter. Le terme « rack à squat » est une expression générique qui englobe les éléments suivants :
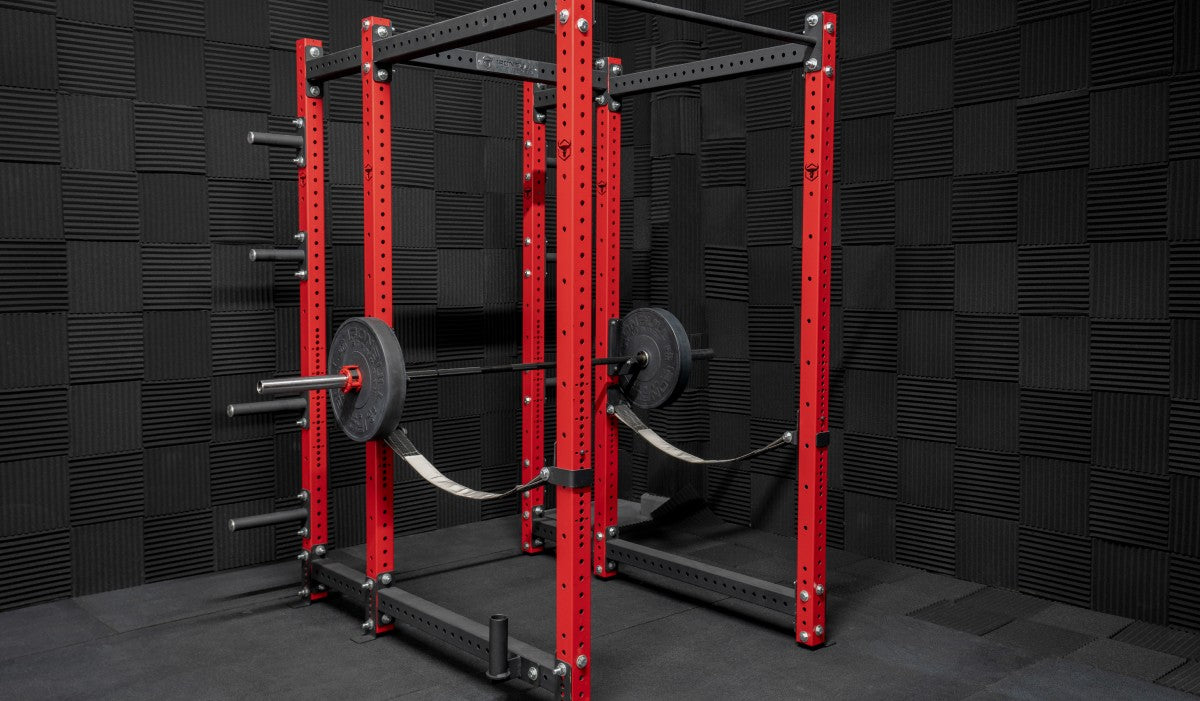
Power Rack : Il s'agit d'une cage composée de quatre montants reliés par des traverses. Vous effectuez vos exercices à l'intérieur du rack. De nombreux accessoires peuvent être ajoutés pour étendre l'amplitude des exercices. C'est le type de rack le plus stable et le plus solide, mais aussi le plus grand, le plus encombrant et le plus cher.
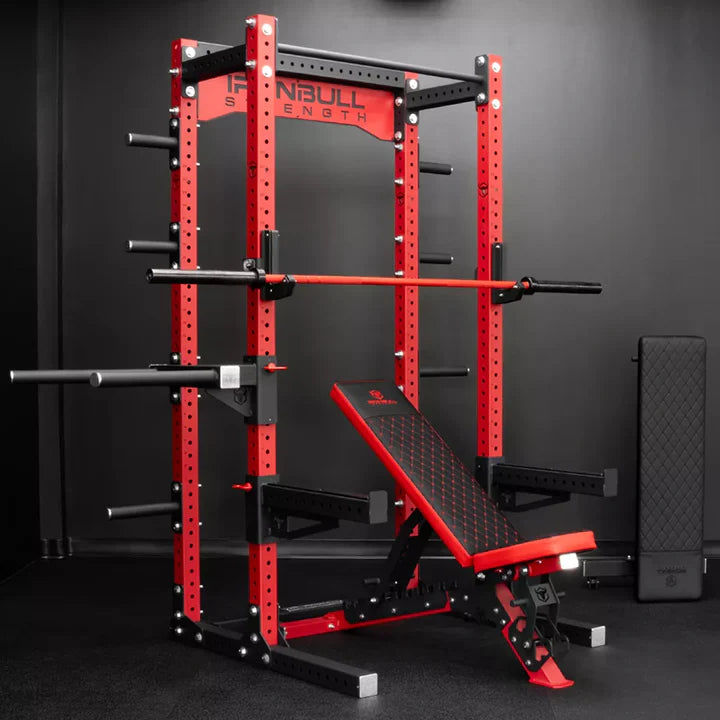
Rack à squat : Un rack à squat (aussi appelé demi-rack) est la moitié d'un rack de musculation, composé de deux montants reliés par une traverse. Il est équipé de bras de sécurité réglables qui s'étendent depuis les montants. Bien que moins solide et stable qu'un rack de musculation, un rack à squat est plus compact, ce qui le rend idéal pour les personnes disposant d'un espace de gym limité.
Support pliable : un support pliable est composé de deux montants muraux qui pivotent et se verrouillent pendant l'entraînement. Une fois votre séance terminée, vous pouvez le replier contre le mur, occupant ainsi seulement quelques centimètres d'espace horizontal.
Votre choix dépendra de l'espace disponible et de votre budget. La meilleure option est un rack de musculation, suivi d'un rack à squat.
Capacité de poids maximale
Tous les racks ont une capacité de charge maximale, indiquant le poids maximal que les montants, les supports en J et les bras de sécurité peuvent supporter. Un rack bon marché peut supporter jusqu'à 225 kg, tandis que les modèles plus robustes peuvent supporter le double, voire plus.
Recherchez un support avec une capacité de poids d'au moins quelques centaines de livres supérieure au maximum que vous envisagez de pouvoir soulever lors de votre exercice le plus fort (très probablement le squat ou le soulevé de terre ).
Calibre d'acier
La résistance et la durabilité de votre rack à squat dépendent de l'épaisseur de l'acier utilisé pour son cadre. Plus l'épaisseur est faible, plus le rack est solide. La plupart des racks de salle de sport ont une épaisseur comprise entre 14 et 11. Sans surprise, les racks de qualité supérieure sont plus chers, car l'acier est plus cher. Cependant, je recommande d'opter pour un rack avec une épaisseur de 11. Cela garantira une résistance exceptionnelle et une longue durée de vie.
J-Cups
Les J-Cups sont des crochets qui se fixent aux montants du rack pour maintenir une barre olympique. Il existe trois types de J-Cups :
Standard : Cette barre J-Cup est partiellement recouverte de plastique pour la protéger du contact métal contre métal. Cependant, certaines parties de votre barre seront toujours en contact avec le métal, ce qui peut provoquer des rayures.
Rouleau : Ce type de coupe est doté d'un rouleau en nylon qui permet de centrer facilement la barre. Cette fonctionnalité est un peu plus onéreuse, mais son côté pratique en vaut la peine.
Sandwich : Moins épais qu'un J-Cup standard, celui-ci est constitué d'une plaque de plastique à très haut poids moléculaire (UHMW) intercalée entre des plaques d'acier. Ainsi, l'intégralité de votre barre olympique repose sur un plastique résistant, évitant ainsi les rayures.
Découvrez nos J-Cups pour racks à squat .
Espacement des trous
La distance entre les trous des montants du rack à squats détermine la hauteur de la barre à adapter à vos besoins. L'espacement standard des trous est de 5 cm. Cela convient généralement aux squats. Cependant, pour le développé couché, un espacement de 5 cm peut ne pas vous permettre d'obtenir la hauteur de barre idéale.
Les bancs de qualité supérieure sont dotés d'un espacement des trous Westside. Cet espacement est de 5 cm au-dessus et en dessous de la zone de développé couché. À l'intérieur de cette zone, l'espacement des trous est réduit à 2,5 cm. Cela permet un positionnement plus personnalisé de la barre lors de la préparation du développé couché.
Assemblage de votre rack à squat
Votre tout nouveau rack à squat vous sera livré en pièces détachées. Il est essentiel de prendre le temps de l'assembler et de suivre attentivement les instructions écrites. Se faire aider d'un ou deux amis pour l'assemblage sera également un atout.
Assurez-vous que chaque boulon est bien serré et qu'il ne manque aucune pièce, y compris les écrous. Je vous recommande également de boulonner votre rack au sol si possible. Sinon, chargez les piquets de poids avec des plaques pour le lester.
Comment installer votre rack à squat en toute sécurité
Avant de vous lancer dans votre première série sur le rack à squats, prenez quelques minutes pour personnaliser les réglages. Cela vous permettra de ranger et de retirer la barre facilement et en toute sécurité, et de garantir que les barres de sécurité sont bien réglées en cas de chute.
Voici comment installer votre rack à squat :
Régler les J-Cups
Réglez le niveau des J-Cups de manière à ce que la partie inférieure, où repose la barre, soit légèrement plus basse que le niveau de vos épaules. Cela vous permettra de soulever et de soulever la barre sans lever les orteils ni vous baisser.
Si vous pratiquez le squat avec un partenaire d'entraînement ou un groupe, vous devrez évaluer les différences de taille entre vous. Si vous avez tous à peu près la même taille, vous devriez pouvoir vous en sortir avec le même réglage. Cependant, si quelqu'un est sensiblement plus grand ou plus petit que les autres, vous devrez ajuster les réglages du J-Cup pour lui, puis les remettre pour les autres une fois qu'il a terminé.
Testez la hauteur du J-Cup avec une barre olympique non chargée avant de commencer votre entraînement.
Centrer la barre
Placez une barre olympique non chargée sur les J-Cups. Centrez la barre de manière à ce que les extrémités des J-Cups soient uniformément surplombées. Le moletage central doit se trouver à mi-distance entre les J-Cups.
Régler les bras de sécurité
Les bras de sécurité sont conçus pour attraper la barre si vous ne parvenez pas à terminer votre répétition. Ils doivent être suffisamment bas pour saisir la barre rapidement, mais pas trop haut pour ne pas gêner votre amplitude de mouvement.
Pour les squats, placez les bras de sécurité 2,5 à 5 cm en dessous de la barre en position basse. Assurez-vous que les deux barres de sécurité sont au même niveau. Effectuez ensuite quelques répétitions avec une barre vide pour vous assurer de la bonne position.
Chargez la barre olympique
Chargez la barre uniformément, avec les mêmes plaques de chaque côté. Assurez-vous que les plaques sont bien serrées l'une contre l'autre. Fixez ensuite des colliers de serrage aux deux extrémités.
Comment s'accroupir en toute sécurité sur le Squat Rack
Pour squatter en toute sécurité sur un rack, le plus important est de rester à portée des barres de sécurité. Si vous travaillez dans une cage de musculation, ce n'est pas un problème. En revanche, sur un rack à squat, les barres de sécurité dépassent des montants. Si vous reculez trop, vous serez hors de portée des barres de sécurité, ce qui rendra le rack inutile.
Pour cette raison, il est conseillé de reculer d'un pas. Je recommande de reculer les pieds un par un pour plus de sécurité.
Voici un aperçu de la façon de s'accroupir sur le rack :
- Placez-vous sous la barre, les pieds écartés à la largeur des épaules, les trapèzes et les épaules plaqués contre la barre. Saisissez la barre en pronation.
- Déposez la barre et reculez d'un pas pour dégager les J-Cups.
- En position de départ, vos pieds doivent être écartés à la largeur des épaules, les orteils pointés légèrement vers l'extérieur.
- Contractez votre ceinture abdominale, soulevez votre poitrine et étirez vos grands dorsaux. Rentrez et abaissez vos omoplates.
- Inspirez en pivotant vos hanches pour abaisser vos fesses et les ramener vers l'arrière. Maintenez le buste droit en descendant légèrement plus bas que parallèlement au sol.
- Appuyez sur les talons pour revenir à la position de départ.
Aides à la sécurité pour rack à squat
Voici un aperçu des aides à la sécurité des racks à squat les plus couramment utilisées :
- Bras de sécurité : Les bras de sécurité sont des barres métalliques horizontales qui peuvent être insérées à différentes hauteurs sur les montants du rack à squat. Leur fonction est de rattraper la barre si vous ne parvenez pas à terminer une répétition. Ils doivent être placés à une hauteur permettant de rattraper rapidement une barre qui tombe sans gêner l'amplitude de mouvement de l'exercice.
En squat, placez les barres juste en dessous de leur position initiale. Cela vous permettra de simplement faire rouler la barre sur vos épaules et de la poser sur les bras de l'observateur si vous ne parvenez pas à sortir du trou.
- Broches de sécurité : Les broches de sécurité ont la même fonction que les bras de sécurité, mais sont plus courtes. Elles maintiennent la barre si vous travaillez près du rack. Elles ne sont pas très pratiques pour des exercices comme le développé couché, où vous vous allongez et ramenez la barre au-dessus de votre corps.
- Sangles de sécurité : Conçues pour les racks à quatre montants, elles se fixent entre les montants de chaque côté du rack, comme des barres de sécurité. L'avantage des sangles est qu'elles offrent plus de souplesse lorsque la barre tombe dessus. Ainsi, la barre ne rebondit pas, ce qui augmente votre sécurité et réduit le risque d'endommager votre équipement. Les sangles de sécurité sont fabriquées en nylon, cuir ou tissu résistant.
- Fixations pour disques de poids : La plupart des racks à squat et des cages de musculation sont équipés de fixations métalliques solides à la base du cadre pour le rangement des disques. Leur utilisation offre deux avantages :
Tout d'abord, cela vous évite d'avoir des disques de poids qui encombrent votre espace d'entraînement. J'ai vu pas mal de blessures causées par des personnes trébuchant sur des disques, y compris ces minuscules poids de 560 g, autour du rack à squats. Alors, ne pensez pas que cela ne vous arrivera pas !
Charger les piquets de rangement des poids renforce également la stabilité de votre rack à squat. Ce poids supplémentaire empêchera votre rack de bouger latéralement lorsque vous effectuez une charge maximale au squat ou au soulevé de terre. Ceci est particulièrement important si votre rack à squat n'est pas fixé au sol.
Que faire si vous ne parvenez pas à terminer une répétition ?
Si vous n'arrivez pas à terminer une répétition en vous accroupissant sur un rack à squat, il est facile de paniquer. Après tout, vous portez sur vos épaules un poids insurmontable qui menace de vous écraser !
N'oubliez pas cependant que vous travaillez avec un appareil conçu pour cette situation. Essayez donc de rester calme.
Après avoir décidé que vous ne pouvez pas terminer la répétition, prenez un moment pour vous ressaisir. Maintenant, posez simplement la barre sur les barres de sécurité, les goupilles ou les sangles que vous avez installées. Si vous les avez réglées à la bonne hauteur, l'exercice devrait se dérouler sans problème.
Avez-vous besoin d’un observateur humain sur le Squat Rack ?
La décision d'utiliser un observateur humain en plus des mécanismes de sécurité intégrés du rack à squat dépend d'un certain nombre de facteurs :
- Votre niveau d'expérience : Je vous recommande d'avoir un observateur à vos côtés si vous débutez en squat. Cette personne doit être plus expérimentée que vous pour vous guider sur la bonne technique et savoir comment réagir si vous ne parvenez pas à terminer une répétition.
- Poids soulevé : Si vous effectuez des répétitions de 1 à 6, un observateur humain vous offrira une sécurité supplémentaire. Il pourra peut-être vous fournir une poussée vers le haut pour vous aider à terminer la répétition et/ou à replacer la barre.
- Votre niveau de confiance : Certaines personnes se sentent plus en confiance lorsqu'elles ont un observateur derrière elles, tandis que d'autres ressentent exactement le contraire. Choisissez la méthode la plus efficace pour vous aider à atteindre votre plein potentiel.
Comment repérer sur un rack à squat
Un mauvais observateur est bien pire que pas d'observateur du tout. Une personne qui ne sait pas ce qu'elle fait risque de vous déséquilibrer, augmentant ainsi le risque de blessure. Voici comment repérer quelqu'un qui fait des squats sur un rack à squats :
- Placez-vous derrière l'athlète et légèrement sur le côté, lui laissant suffisamment d'espace pour effectuer le squat sans interférence.
- Gardez vos pieds écartés à la largeur des épaules pour plus de stabilité, avec les genoux légèrement pliés pour maintenir l'équilibre.
- Établissez une communication claire avec l'athlète avant qu'il ne commence sa série. Discutez du nombre de répétitions qu'il prévoit d'effectuer et des indications spécifiques qu'il pourrait utiliser en cas de besoin.
- Déterminez le niveau de confort de l'athlète avec le repérage. Certains athlètes préfèrent une assistance minimale, tandis que d'autres souhaitent un repérage plus actif.
Soyez attentif à la posture et à la technique de l'athlète tout au long de la série. Soyez attentif aux signes de fatigue, d'instabilité ou de baisse de posture pouvant indiquer des difficultés.
- Si l'athlète commence à avoir des difficultés lors d'une répétition, soyez prêt à lui apporter votre aide si nécessaire. Cette aide peut varier selon les préférences de l'athlète et les circonstances.
- Pour les difficultés mineures : fournissez des indices verbaux ou des encouragements pour aider l'athlète à terminer la répétition.
- En cas de difficultés plus importantes, utilisez vos mains pour soutenir légèrement l'athlète sous les bras ou les coudes afin de l'aider à maintenir son équilibre et son contrôle. Évitez de soulever le poids à sa place, sauf en cas d'absolue nécessité.
- Si l'athlète ne peut pas effectuer la répétition en toute sécurité : aidez-le à replacer la barre sur le support à squat ou sur des goupilles de sécurité ou des sangles, si disponibles. Assurez-vous d'effectuer un mouvement fluide et contrôlé pour éviter toute blessure, pour l'athlète ou pour vous-même.
- Maintenez une position forte et stable tout au long du processus de repérage pour assurer votre propre sécurité.
- Ne vous penchez pas trop au-dessus de l'athlète, sinon vous risquez de compromettre son équilibre et le vôtre. Soyez attentif à ce qui vous entoure afin de ne heurter personne ni quoi que ce soit.
FAQ
Q : Comment savoir si j'ai réglé les bras de repérage de sécurité à la bonne hauteur ?
R : Vous saurez que les bras de sécurité sont à la bonne hauteur en effectuant quelques répétitions avec une barre déchargée. Les sécurités devraient vous permettre d'effectuer des répétitions complètes sans interférence. Arrêtez-vous en position basse de la répétition et faites rouler la barre sur les sécurités. Elle devrait rouler directement dessus.
Q : Puis-je utiliser les accessoires de sécurité pour d’autres exercices en plus des squats ?
R : Oui, les accessoires de sécurité sur un support à squat sont conçus pour être utilisés pour une large gamme d’exercices, notamment le développé couché, le développé couché au-dessus de la tête et le soulevé de terre.
Q : Puis-je effectuer des squats sans accessoires de sécurité dans le support à squat ?
R : Vous pouvez effectuer des squats sans accessoires de sécurité dans le rack à squats ; cependant, cela n'aurait aucun intérêt pratique. Les sécurités ont une fonction importante : vous éviter de vous blesser ou d'endommager votre équipement si vous ne parvenez pas à terminer une répétition.
Conclusion
Avant de commencer à faire des squats sur le rack, il est important de prendre le temps d'apprendre les bases de la sécurité. L'installation du rack pour une utilisation optimale ne vous prendra que quelques minutes. Mais si vous ne le faites pas, vous risquez de vous blesser.
N'oubliez pas non plus que la sécurité de votre rack à squat dépend de la qualité de l'appareil que vous achetez. Suivez les conseils d'achat présentés dans cet article pour vous assurer d'obtenir le rack à squat le mieux adapté à vos besoins.
Envie de gagner du temps et d'accéder directement à la crème de la crème ? Découvrez la gamme de racks à squat Iron Bull ici . Découvrez également tous nos accessoires, y compris les modules de sécurité, pour améliorer votre équipement !


